
概要
以前conoha VPSサーバをレンタルしてNode-RED、mqttブローカ、MariaDB、MongoDB等のサーバにしていたが、一番廉価のプランをレンタルしていて、このプランではグレードアップが出来ないことを知り、もう少し自由度が欲しくなって自前のサーバにすることにした。
サーバは音が静かなパソコンを探したところ、Yahooショッピングで「HP t520 Flexible Thin Client」というファンレスの物が見つかったのでこれを採用することにした。残念なことにメモリの増設が出来ないことだった。
自前のサーバを外部からもアクセスできるようにすると、家全体のセキュリティを心配しなければならないので宅内だけで使用することにした。
このメモの元はGoogleサイトに載せておいた記事をこちらへ再掲した。作成した時期は2023年秋ころである。
Ubuntu Server の諸元
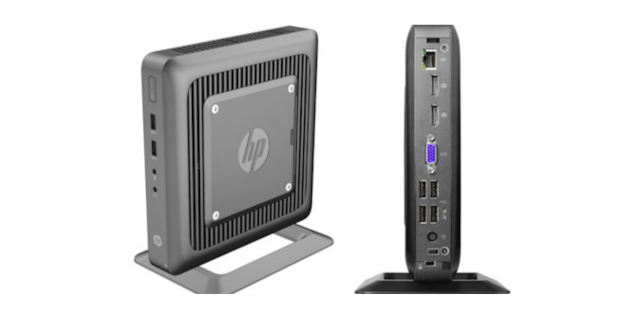
| 名称 | HP t520 Flexible Thin Client |
| CPU | AMD GX-212JC 1.2GHz dual-core SOC APU with AMD Radeon HD Graphics 64bit |
| メモリー | 8GB DDR3L-1600 SODIMM SDRAM |
| ストレージ | 256GB M.2 2242 SSD SATA3 6GB/S |
| OS | Ubuntu 22.04 LTS (GNU/Linux 5.15.0-39-generic x86_64) |
ubutu server 22.04 lts のインストール
ubuntu server のインストール時に最初のログインユーザ名を決める
da30 PASSWORD
0.0.システムをローカルタイムに設定する。
$ sudo timedatectl set-timezone Asia/Tokyo
0.1.ネット関係ツールのインストール
$ sudo apt install net-tools
0.2.固定アドレスを設定する
下記サイトを参考
Ubuntu 20.04 LTSで固定IPアドレスを設定する方法
https://linuxfan.info/ubuntu-2004-server-static-ip-address

「/etc/netplan/00-installer-config.yaml」ファイルを編集
ーーーーーーーーーーーーーーーーーーー
network:
   ethernets:
       enp0s3:
#            dhcp4: true  <---コメントアウト
#-------------------------ここから--------------
           addresses: [192.168.0.5/24]
           gateway4: 192.168.0.1
           nameservers:
               addresses: [192.168.0.1]
               search: []
           optional: true
#-------------------------ここまで-追加---------
   version: 2
ーーーーーーーーーーーーーーーーーーー
MQTT サーバのインストール
下記サイトを参考
https://www.arubacloud.com/tutorial/how-to-install-and-secure-mosquitto-on-ubuntu-20-04.aspx

1.1. mosquitto をインストール
$ sudo apt update -y && sudo apt install mosquitto mosquitto-clients -y

1.2.mosquitto broker の実行確認
$ sudo systemctl status mosquitto
Node.js のインストール
以下のサイトを参照
https://www.digitalocean.com/community/tutorials/how-to-install-node-js-on-ubuntu-20-04-ja
https://github.com/nodesource/distributions/blob/master/README.md#debinstall

2.1.Node.js Npm の最新版インストール
Node.js の最新版は 16.0 (2022-02-24 時点)
$ curl -fsSL https://deb.nodesource.com/setup_16.x | sudo -E bash -
$ sudo apt install -y nodejs

ここでインストールした npm のバージョンは 8.5.5 で、最新は 8.8.0 と表示されていたので npm をアップデートした。
$ sudo npm update -g npm update -g npm

2.2.n のインストール
$ sudo npm install n -g

$ node -v (node.js のバージョン確認)
結果は v16.15.0
$ npm -v (npm のバージョン確認)
結果は 8.5.5
$ n -V (n のバージョン確認、-V は大文字)
結果は v8.2.0
Node-RED のインストール
下記サイトを参考
https://qiita.com/KiKUiCHi_R1R/items/f3598dee0628f80ae41a

$ sudo npm install -g --unsafe-perm node-red
$ node-red -v (Node-RED のバージョン確認)
結果は v2.2.2
Node-RED の自動起動を設定する
4.1.pm2 をインストール
$ sudo npm install -g pm2

4.2.node-redコマンドの正しい位置を定義する。
$ which node-red /
結果は /usr/bin/node-red

4.3.pm2で node-red を起動する
$ pm2 start /usr/bin/node-red -- -v

4.4.自動起動の準備
$ pm2 save
$ pm2 startup

4.3.Node-RED の自動起動を設定する
$ sudo env PATH=$PATH:/usr/bin \ /usr/lib/node_modules/pm2/bin/pm2 startup systemd -u da30 --hp /home/da30

4.4.Node-RED の動作を確認する
$ pm2 info node-red
$ pm2 logs node-red

4.5.ユーザー認証の設定
下記設定ファイルを変更する
$ nano ~/.node-red/settings.js

--------------------------------この部分を
   //adminAuth: {
   //    type: "credentials",
   //    users: [{
   //        username: "admin",
   //       password:"$2a$08$zZWtXTja0fB1pzD4sHCMyOCMYz2Z6dNbM6tl8s
JogENOMcxWV9DN.",
   //        permissions: "*"
   //    }]
   //},
--------------------------------このように書き換える
adminAuth: {
   type: "credentials",
   users: [
       {
           username: "admin",
           password:"$2b$08$C0XKP6y3SnZOe0l6w3f63OTJUgVSqSiklb6shdg
UOPQHZdfkSg99C",
           permissions: "*"
       },
       {
           username: "da30",
           password: "$2b$08$C0XKP6y3SnZOe0l6w3f63OTJUgVSqSiklb6shdg
UOPQHZdfkSg99C",
           permissions: "*"
       }
   ]
},
--------------------------------
※permissions の種類には "*" と "read" の2種類しかない
Mariadb のインストール
5.1.最新の Mariadb をインストールする。
Mariadb のサイト以下を参照する。
https://mariadb.org/download/?t=repo-config&d=20.04+%22focal%22&v=10.7&r_m=yamagata-university

Choose a distribution は
ubuntu 20.04 "focal" を選択
Choose a MariaDB Server version は
10.7 を選択
Mirror
デフォルト表示のままを選択し、
その下のボックスの内容をコピーして実行する。
$ sudo apt-get install software-properties-common dirmngr apt-transport-https
$ sudo apt-key adv --fetch-keys 'https://mariadb.org/mariadb_release_signing_key.asc'
$ sudo add-apt-repository 'deb [arch=amd64,arm64,ppc64el,s390x] \ https://ftp.yz.yamagata-u.ac.jp/pub/dbms/mariadb/repo/10.7/ubuntu focal main'

$ sudo apt update
$ sudo apt install mariadb-server

5.2.MariaDBを設定する
「Ubuntu 20.04にMariaDBをインストールする方法」
https://www.digitalocean.com/community/tutorials/how-to-install-mariadb-on-ubuntu-20-04-ja

5.2.1.MariaDBの管理者を設定する
$ sudo mariadb
MariaDB [(none)]> GRANT ALL ON *.* TO 'admin'@'localhost' IDENTIFIED BY 'xxxxxxxx' \ WITH GRANT OPTION;
MariaDB [(none)]> FLUSH PRIVILEGES;
MariaDB [(none)]> exit

5.2.2.MariaDBの動作を確認する
$ sudo systemctl status mariadb

MariaDBが実行されていない場合は
$ sudo systemctl start mariadb
で起動する。

5.3.外部からのログインは下記を参考
https://osmaniax.1banzaka.com/linux/mysql-mariadb%E3%81%AB%E5%A4%96%E9%83%A8%E6%8E%A5%E7%B6%9A%E3%81%99%E3%82%8B/428

5.3.1.外部ユーザー用のアカウントを設定する
$ sudo mariadb
MariaDB [(none)]> grant all privileges on *.* to 'da30'@'%' identified by 'mt5703' with grant option;

5.3.2.外部からのアクセスを有効にする
MariaDB の設定ファイル
/etc/mysql/mariadb.conf.d/50-server.cnf
から
bind-address           = 127.0.0.1
行をコメントアウトする。

管理者:
admin PASSWORD
外部からのログインユーザ
da30 PASSWORD
mongoDBのインストール
インストールはMongoDBのインストール説明を参考
「UbuntuにMongoDBCommunityEditionをインストール」

6.1.MongoDBパブリックGPGキーをインポートする
$ wget -qO - https://www.mongodb.org/static/pgp/server-5.0.asc | sudo apt-key add -

6.2.MongoDBのリストファイルを作成する
$ echo "deb [ arch=amd64,arm64 ] https://repo.mongodb.org/apt/ubuntu focal/mongodb-org/5.0 multiverse" | sudo tee /etc/apt/sources.list.d/mongodb-org-5.0.list

6.3.ローカルパッケージデータベースをリロードする
$ sudo apt-get update

6.4.MongoDBパッケージをインストールする
$ sudo apt-get install -y mongodb-org

6.5.MongoDBを起動
$ sudo systemctl start mongod

6.6.MongoDBが正常に起動したことを確認
$ sudo systemctl status mongod

6.7.システムの起動後にMongoDBが起動するようにする
$ sudo systemctl enable mongod

6.8.root権限のあるユーザーを作成する
下記サイトを参考にした
https://mebee.info/2021/12/06/post-50217/

6.8.1.root権限のあるユーザーを作成する
$ sudo mongo
> use admin
> db.createUser({user:"admin", pwd:"PASSWORD", roles:["root"]})
> exit

6.8.2.ログインして確認
$ sudo mongo -u admin

6.9.外部からの接続ができるようにする
下記サイトを参考
https://self-development.info/mongodb%E3%81%B8%E3%81%AE%E5%A4%96%E9%83%A8%E6%8E%A5%E7%B6%9A%E3%82%92%E8%A8%B1%E5%8F%AF%E3%81%99%E3%82%8B%E6%96%B9%E6%B3%95%E3%80%90python%E3%81%A7%E6%8E%A5%E7%B6%9A%E7%A2%BA%E8%AA%8D%E3%80%91/

MongoDBの設定ファイルを編集
/etc/mongod.conf

$ sudo cp /etc/mongod.conf /etc/mongod.conf.org
$ sudo nano /etc/mongod.conf
下記部分を変更する
------------------------------------------------------
# network interfaces
# 外部からの接続を許可する設定 2022-02-25
#  bindIp: 127.0.0.1 ---> bindIp: 0.0.0.0
net:
 port: 27017
 bindIp: 0.0.0.0
        ^ 大文字のⅠ(アイ)
------------------------------------------------------
参考にしたサイト
※参考サイトについてはリンク切れがあるかもしれない。
- Ubuntu 20.04 LTSで固定IPアドレスを設定する方法【サーバー編】
https://linuxfan.info/ubuntu-2004-server-static-ip-address - How to install and secure Mosquitto on Ubuntu 20.04
https://www.arubacloud.com/tutorial/how-to-install-and-secure-mosquitto-on-ubuntu-20-04.aspx - Ubuntu 20.04にNode.jsをインストールする方法
https://www.digitalocean.com/community/tutorials/how-to-install-node-js-on-ubuntu-20-04-ja - Node.jsとnpmをアップデートする方法
https://parashuto.com/rriver/tools/updating-node-js-and-npm - NodeSource Node.js Binary Distributions
https://github.com/nodesource/distributions/blob/master/README.md#debinstall - 2021.12.09現在→Ubuntu 20.04 LTS にて node-red 最新環境(現時点で2.1)を構築する
https://qiita.com/KiKUiCHi_R1R/items/f3598dee0628f80ae41a - Ubuntu 20.04にMariaDBをインストールする方法
https://www.digitalocean.com/community/tutorials/how-to-install-mariadb-on-ubuntu-20-04-ja - Download MariaDB Server
https://mariadb.org/download/?t=repo-config&d=20.04+%22focal%22&v=10.7&r_m=yamagata-university - mariaDB10.1サーバに外部から接続する
https://osmaniax.1banzaka.com/linux/mysql-mariadb%E3%81%AB%E5%A4%96%E9%83%A8%E6%8E%A5%E7%B6%9A%E3%81%99%E3%82%8B/428 - Install MongoDB Community Edition on Ubuntu
https://docs.mongodb.com/manual/tutorial/install-mongodb-on-ubuntu/ - mongoDB root権限のあるユーザーを作成する
https://mebee.info/2021/12/06/post-50217/ - MongoDBへの外部接続を許可する方法【Pythonで接続確認】
https://self-development.info/mongodb%E3%81%B8%E3%81%AE%E5%A4%96%E9%83%A8%E6%8E%A5%E7%B6%9A%E3%82%92%E8%A8%B1%E5%8F%AF%E3%81%99%E3%82%8B%E6%96%B9%E6%B3%95%E3%80%90python%E3%81%A7%E6%8E%A5%E7%B6%9A%E7%A2%BA%E8%AA%8D%E3%80%91/